You have a few PST files and you want them inside Office 365. Sounds like a five-minute job, right? It is not. First you assign a role. Then you copy a SAS URL, run AzCopy and build a mapping CSV. One wrong filename in that CSV and the job fails. I have seen this happen many times, and it is always the small things.
Short answer: there are three ways to import PST files to Office 365. Network Upload: you upload PST files to Azure Storage with AzCopy and map them to mailboxes in the Microsoft Purview portal. Drive Shipping: you send a BitLocker-encrypted hard drive to Microsoft. Or you use Stellar Migrator for Outlook, which moves PST data straight into primary, archive and public folder mailboxes. No AzCopy, no CSV.
In this guide, I will explain Network Upload step by step, because that is where most admins get stuck. Drive Shipping gets a short note. And I will tell you which method fits which target: primary mailbox, archive mailbox or public folder.
Which method should you use?
| Method | Best for | Primary mailbox | Archive mailbox | Public folder | Effort |
| Network Upload | Small to mid-size imports, admins comfortable with command line | Yes | Yes (IsArchive = TRUE) | No | Medium |
| Drive Shipping | Very large data, slow or limited internet | Yes | Yes | No | High |
| Stellar Migrator for Outlook | Bulk migrations, archive and public folder targets, non-technical teams | Yes | Yes | Yes | Low |
Primary, Archive and Public Folder: know your target first
First, decide where the PST data should land. Do this before you touch any setting. This one decision changes your mapping file, and sometimes the whole method.
| Target | What it is | When to use it |
| Primary mailbox | The user’s main Exchange Online mailbox, where daily mail, calendar and contacts live. | The PST is current data the user needs every day. |
| Archive mailbox | An additional Exchange Online mailbox (in-place archive) for older items, so the primary mailbox quota is not eaten up. | The PST holds years of old mail. Archive has to be enabled for that user first. |
| Public folder | Shared folders stored in public folder mailboxes, used for team-wide content. | The PST belongs to a department or shared process, not one person. |
Before you start: prerequisites
- Mailbox Import Export role. Even a Global Administrator does not have it by default. You have to assign it yourself (Step 1 below).
- Wait for the permission to apply. If you use Microsoft Entra Privileged Identity Management for just-in-time access, Microsoft says it can take up to two hours before the permissions apply in Microsoft Purview. So do not start the job and panic.
- Archive enabled. For archive import, the archive mailbox must already be enabled for that user.
- PST files in a reachable location. A local folder or a network share that the machine running AzCopy can read. Microsoft recommends keeping each PST at 20 GB or less.
- The right portal view. What you see in the Microsoft Purview portal depends on your permissions and subscription. If you do not see the Import option, check your role and licence first.
| Naming heads-up: Microsoft has retired the older compliance portal. All the steps below are done in the Microsoft Purview portal (purview.microsoft.com). |
Method 1: Import PST to Office 365 using Network Upload
Network Upload is the standard method from Microsoft. You upload PST files over the network to a temporary Azure Storage location with AzCopy. Then you tell Office 365 which PST goes to which mailbox using a CSV file, and start the import job. There is no extra cost, but you need patience and accuracy. Follow the steps in the same order.
Step 1: Assign the Mailbox Import Export role
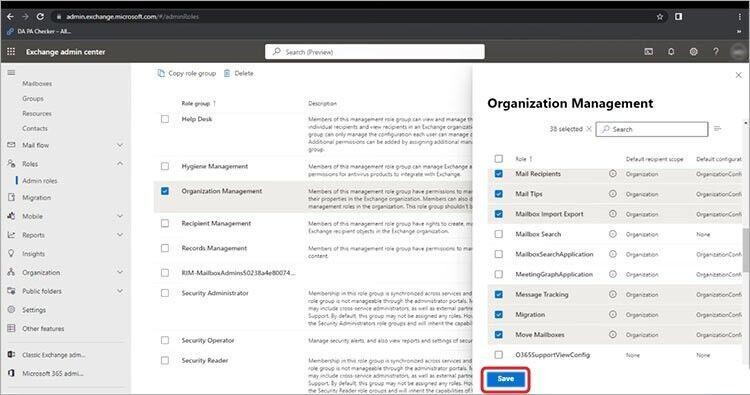
- Sign in to the Exchange admin center and go to Roles > Admin roles.
- Select Organization Management, open the Permissions tab and click Add.
- Choose Mailbox Import Export (add Mail Recipients too, if it is not there) and save.
Step 2: Create a new import job in the Microsoft Purview portal
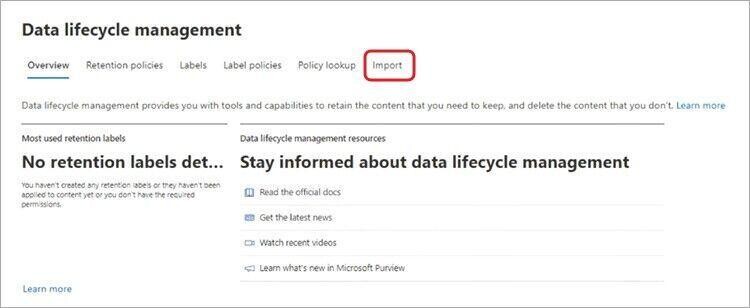
- Open the Microsoft Purview portal and go to Solutions > Data Lifecycle Management > Import.
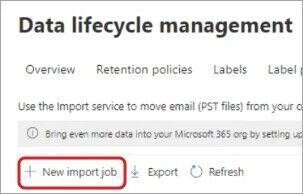
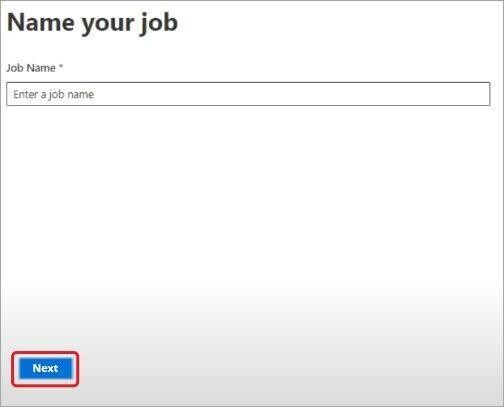
- Click New import job and enter a name. Keep it simple: lowercase letters, numbers and hyphens, no spaces.
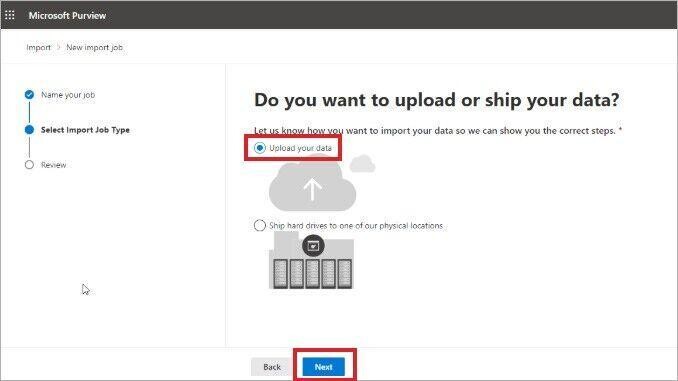
- Select Upload your data and click Next.
Step 3: Copy the SAS URL and download AzCopy
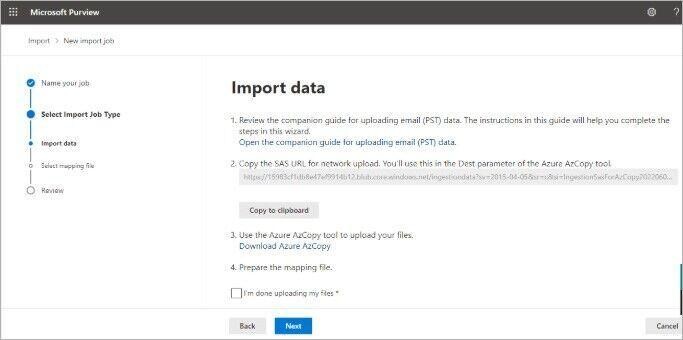
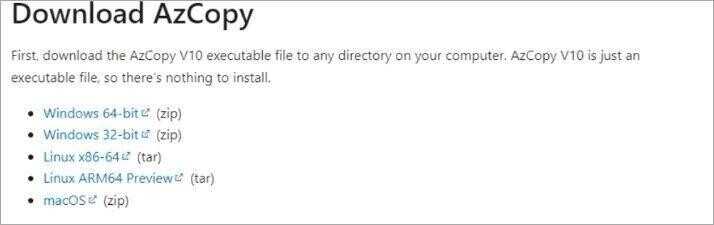
On the next screen, click Show network upload SAS URL and copy it into Notepad. Treat this URL like a password. Anyone who has it can upload to your import location. Then click Download Azure AzCopy and install it.
| Important: The command in this guide is for AzCopy v10. Older versions use different syntax, so run azcopy –version first. Also keep the import job page open while you upload. If the SAS URL stops working, create a new import job and get a fresh URL. |
Step 4: Upload your PST files with AzCopy
Open Command Prompt, go to the AzCopy folder and run the command below. Change the path to your PST folder, and paste your own SAS URL inside the second set of quotes.
azcopy.exe copy "\\FILESERVER01\PSTs" "<paste your SAS URL here>" --recursive=trueWhen the transfer ends, AzCopy shows a summary with completed files and failures. If anything failed, run the command again before you go to the next step.
Step 5: Check the upload (optional but worth it)
Want to be sure every PST reached Azure? Open the SAS URL in Azure Storage Explorer and look inside the ingestiondata container. It takes two minutes, and it saves you from hunting a missing file later.
Step 6: Create the PST Import mapping file
The mapping file is a CSV that tells Office 365 which PST goes to which mailbox. This is where most imports go wrong, so take your time. You can download the template from the import job page. These are the columns that matter:
| Column | What to enter |
| Workload | Always Exchange for mailbox imports. |
| FilePath | Leave it blank if the PST files are at the root of the upload location. If they are in a subfolder, enter the folder path. |
| Name | The exact PST filename. It is case-sensitive, so john.pst and John.pst are not the same. |
| Mailbox | The email address of the target mailbox. |
| IsArchive | FALSE imports into the primary mailbox. TRUE imports into the archive mailbox. |
| TargetRootFolder | Use / to import into the root, or a name such as /ImportedPst to create a dedicated folder. If left blank, data goes into a folder called Imported. |
Here is how it looks for one user with a primary PST and an archive PST:
Workload,FilePath,Name,Mailbox,IsArchive,TargetRootFolder,ContentCodePage,SPFileContainer,SPManifestContainer,SPSiteUrl
Exchange,,john.pst,john@contoso.com,FALSE,/,,,,
Exchange,,john_old.pst,john@contoso.com,TRUE,/ImportedPst,,,,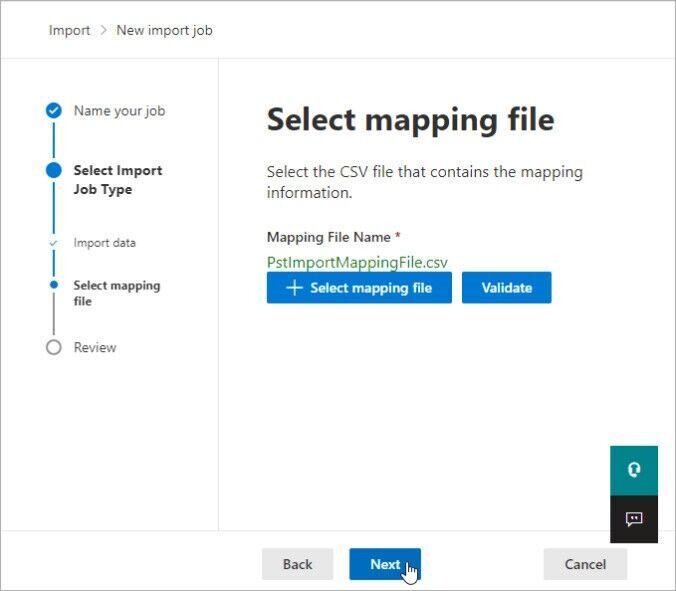
Step 7: Validate the mapping file and start the import
- Go back to the import job page, tick I’m done uploading my files and I have access to the mapping file, and click Next.
- Select the mapping file and click Validate. If it shows errors, fix them first. Do not skip this.
- Save the job. Office 365 analyses the data first. After that, you can import everything or filter the data.
- Click Import data and watch the status on the Import page until it shows Complete.
What about public folders?
Most admins find this limit very late. The Network Upload job is made for Exchange Online mailboxes, that is primary and archive. It does not import a PST into a public folder. The native workaround is Outlook: use Import/Export and bring the PST into the public folder, one PST at a time. For one or two files, fine. For the data of a whole department, it is slow and easy to get wrong.
Method 2: Import PST to Office 365 using Drive Shipping
If your data is huge or your internet is too slow, Microsoft has an offline option: Drive Shipping. You copy the PST files to a BitLocker-encrypted hard drive using the WAImportExport tool and ship the drive to a Microsoft data center. Microsoft uploads the data to Azure, and then you map and start the job like Network Upload. It takes shipping time and has a per-GB fee, so use it only for very large data. For the complete steps, read our detailed guide to import PST to Office 365 using Drive Shipping. [LINK: Drive Shipping article. Anchor text: “import PST to Office 365”]
The simpler way: Stellar Migrator for Outlook
Look at what Network Upload needs: assign roles, wait, copy the SAS URL, run AzCopy, build the CSV by hand, validate, analyse, import. For ten mailboxes, that is a long afternoon. For a hundred mailboxes with archives and public folders, it is a full project.
This is where Stellar Migrator for Outlook helps. It is a desktop software that migrates PST files directly into Microsoft 365. No AzCopy, no SAS URL and no mapping CSV. You select the PST files, connect to your Microsoft 365 tenant, choose the destination and start the migration.
Why it works better for bigger jobs
- One tool for every target. Import into primary mailboxes, archive mailboxes and public folders from the same screen. The native method cannot do all three.
- No command line. A simple guided interface. No AzCopy commands, no CSV syntax.
- Bulk migration. Add many PST files together and map them to users. No building the CSV row by row.
- Folder structure kept. Emails, contacts, calendars, tasks and notes come with the original folder structure.
- Fewer surprises. No waiting for role permissions, and no SAS URL that expires in the middle of your upload.
How to import PST to Office 365 with Stellar Migrator for Outlook
- Download and install Stellar Migrator for Outlook, then launch it.
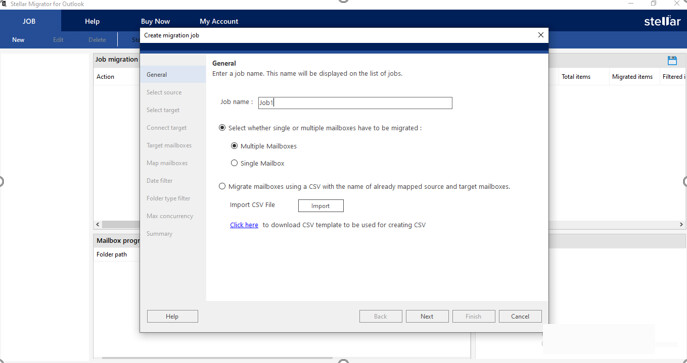
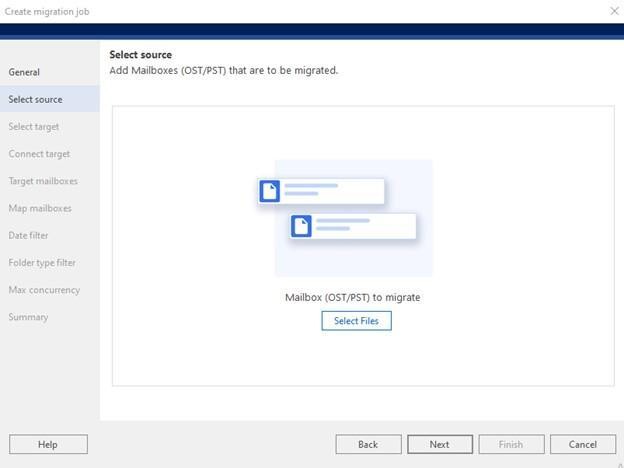
- Add the PST files you want to migrate, or select a folder that contains them.
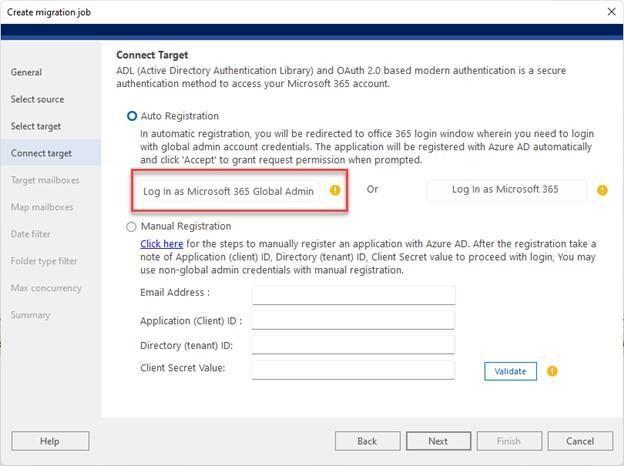
- Connect to your Microsoft 365 tenant and choose the target: primary mailbox, archive mailbox or public folder.
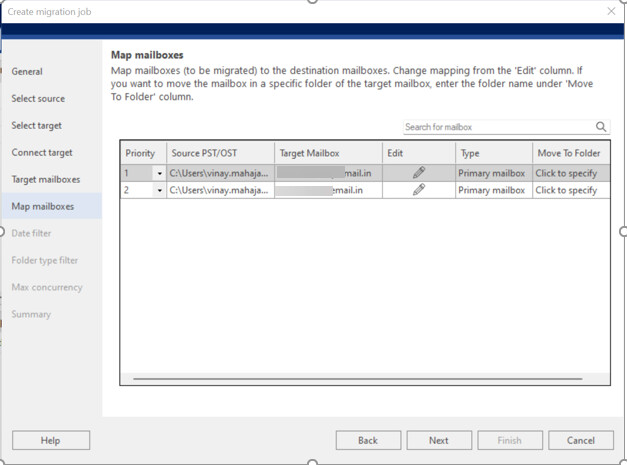
- Map each PST to its destination, check the summary and click Migrate.
So, which method is right for you?
- Use Network Upload if you have only a few PST files for primary or archive mailboxes, and you are fine with AzCopy and CSV.
- Use Drive Shipping if the data is very large and your network cannot handle it.
- Use Stellar Migrator for Outlook if you are migrating in bulk, need archive or public folder targets, or just want the job done without the setup trouble.
Common problems when you import PST to Office 365 (and quick fixes)
- Access denied or Import option missing. The Mailbox Import Export role has not applied yet, or your subscription does not include it. Wait a while, then sign out and sign in again.
- Validation fails on the mapping file. Most of the time the PST name does not match exactly. Check the spelling and the case. If files are in a subfolder, check FilePath also.
- Upload stops or the SAS URL is rejected. The URL has expired or was copied wrong. Create a new import job and use the new SAS URL.
- Import shows 0 items or a few items skipped. Open the job details and check the log. A corrupt PST is a common reason. See our guide to fix the unknown error when importing PST into Office 365. [LINK: Unknown Error blog]
- Archive import fails. The archive mailbox is not enabled for that user, or IsArchive is wrong in the CSV.
Frequently Asked Questions
Can I import a PST file into an archive mailbox in Office 365?
Yes. With Network Upload, set IsArchive to TRUE in the mapping file. The archive mailbox must be enabled for that user first. Stellar Migrator for Outlook also lets you choose the archive mailbox as the destination, without any CSV.
Can I import a PST file into a public folder?
Not with the Microsoft Purview import job. It works for primary and archive mailboxes only. The native way is Outlook, one PST at a time. If you have many PST files, Stellar Migrator for Outlook is faster.
What is the PST file size limit for Office 365 import?
Microsoft recommends 20 GB or less per PST. Bigger files take longer and fail more often. Split very large PSTs before you import.
Which role do I need to import PST files to Office 365?
You need the Mailbox Import Export role in the Exchange admin center (with Mail Recipients). Global Administrators do not get it by default. Assign it to your account and give it some time to apply.
Do I need PowerShell to import PST files to Office 365?
No. Network Upload uses AzCopy and the Microsoft Purview portal. Stellar Migrator for Outlook has a graphical interface. Neither needs PowerShell.
Does the original PST file change after the import?
No. The import copies the data into the mailbox. Your source PST stays as it is. Keep it as a backup until you confirm everything arrived properly.
Conclusion
To import PST files to Office 365, ask yourself three simple things: how much data do I have, where should it go, and how much time can I give to the setup? Network Upload works well if you follow every step. Drive Shipping is for very large data. But if you have many PST files, or archive mailboxes and public folders, Stellar Migrator for Outlook is the easier choice. Everything is done from one screen. Download the free demo and try one test mailbox first. You will see the difference quickly.